Saveo Nursing Care WordPress Theme

Download the Saveo healthcare WordPress theme for free from HornHost. Perfect for medical websites, clinics, and health professionals, Saveo offers a sleek design and customizable features.


DOWNLOAD HERE:

Preview / Demo:

https://saveo.ancorathemes.com  


How to find PayPal API Credentials username, password, and signature: A Step-by-Step Guide

Discovering your PayPal API username, password, and signature information is crucial for many apps to integrate. However, navigating through the PayPal admin interface to locate these details can be challenging. Here’s a comprehensive guide on how to obtain them effortlessly.

But first, why are these API credentials essential?

PayPal allows seamless communication between various applications, shopping carts, reporting systems, and websites through what is known as an API. This API performs various functions, such as checking your PayPal balance, retrieving transaction details, issuing refunds, and more.

To safeguard your PayPal account, API access must be restricted to those with proper authentication. The correct combination of API username, password, and signature is imperative to securely access your PayPal account information from third-party apps or websites.


Here’s a step-by-step process to acquire your API details:

Option 1: Under Tools, More Tools (for the latest PayPal interface)

  1. Log in to your PayPal account.
  2. Hover over the Tools menu in the top navigation and find More Tools. Click it.
  3. Scroll until you find a box with API credentials. Click on it.

4. Shortcut, to directly open the Tools page in your PayPal account.
5. On the API credentials page, select the last option for NVP/SOAP API integration.


6. If it’s your first time creating API credentials, complete the API Credential Request form.
7. Once created, locate the View API Signature option under NVP/SOAP API integration. Clicking on it will reveal your API username, password, and signature.

8. Remember, API credentials are sensitive information. Store them securely and never share them with unauthorized people. In case you suspect a compromise, immediately remove API signature and create a new one – following the steps above.

Option 2: Under Profile – Account Information – API Access

  1. Log in to your PayPal Premier or Business account.
  2. Click on the Profile subtab in the top navigation.
  3. Under Account Information, click the API Access link.
  4. Click the Get Started link under the Request API Credentials heading.
  5. In the left sidebar, click on My Selling Preferences and then the Update option for API access.
  6. Complete the API Credential Request form and submit.

7. Your API username, password, and signature will now be visible.
8. Copy these values into the requesting app or securely share them with your developer.

Still struggling to find the API details?

  1. Log in to your PayPal account.
  2. Click on Profile.
  3. Access the classic Profile version (on the left side, outside the My Selling Tools box).
  4. Under Account Information, click API Access.
  5. Choose Option 2 – Request API credentials and click on View API Signature.”


How to connect a domain or subdomain from another server

Please see the video instructions / demonstration on how you can connect a domain or subdomain from another server or hosting provider.

Make sure to update the A Record for your sub-domain and redirect it to a different hosting provider. This step is essential for smoothly transitioning your sub-domain to a new hosting account. Head to your domain registrar or to your cpanel and insert the A record for your sub-domain, ensuring it now points to your new server IP Adress.

Please watch the video below:

For more information, visit our page: hornhost.com


How to schedule songs in Sonic Panel

This is the demonstration of how to setup and schedule songs from your AUTO DJ, sonic panel.

Unlock the Power of SonicPanel: Your Ultimate Guide to Scheduling Music on Internet Radio! In this step-by-step tutorial, we’ll show you how to seamlessly schedule and automate your music playlists using SonicPanel. From uploading your favorite tracks to creating playlists and setting up a dynamic schedule, our guide covers it all. Elevate your online radio experience with the best practices in internet radio hosting.

Tune in for an immersive journey into the world of scheduling music effortlessly! #SonicPanel #InternetRadio #MusicScheduling #RadioAutomation Sonic is a control panel designed for internet radio hosting, making it easier to manage your Shoutcast and Icecast servers.

To schedule music using SonicPanel, follow these general steps:

Make sure you have already an account with sonic panel or buy from us. https://hornhost.com


Access SonicPanel: Log in to your SonicPanel account using your credentials.Navigate to the AutoDJ Management: Look for the AutoDJ or Media section in SonicPanel. This is where you can manage your scheduled playlists.

Upload Your Music: Before scheduling, ensure your music is uploaded to SonicPanel. Upload your tracks or create playlists based on your preferences.

Create Playlists: In the AutoDJ management, you should find an option to create playlists. Organize your music into playlists, specifying the order of tracks and any repeat settings. Set Schedule: Locate the scheduling feature in SonicPanel.

This could be a calendar or scheduler interface where you can set specific times for playlists to play.

Assign Playlists to Time Slots: Once your playlists are ready, assign them to specific time slots in the scheduler. This allows you to automate when certain playlists or genres play throughout the day.

Save and Apply: After setting up your schedule, make sure to save and apply the changes.

This ensures that your scheduled playlists will play according to the specified time slots.


Monitor and Adjust: Regularly check your scheduling settings to ensure that your playlists are playing as intended. Adjust the schedule as needed, especially if you want to introduce new playlists or make changes to the existing ones.

Remember that the exact steps may vary slightly based on the version of SonicPanel you are using, so be sure to refer to the official SonicPanel documentation or support resources for detailed instructions tailored to your specific setup.

Download free drops and stings

Please click below to download the drops and stings. This is a premium drops and stings with rights and license.

This is a thank you gift for having hornhost as part of your entertainment life.

 Click the image below to download:

php error: Allowed memory size of x bytes exhausted

If you are getting an error like “Allowed memory size of… in file /directory/folder/yourscript.php“, then you can use an .htaccess trick to resolve this problem. If this error does not go away even after you apply this .htaccess code, you should contact us and we will help you.

Place this code in your .htaccess file of your main domain and if this error persists even after you have used the code, enter it in a directory where you are receiving an error, such as example.com/directory/folder/.htaccess and place the code in the /directory folder.

RLimitMem max

How to setup auto dj in Sonic Panel

Please note that the stream link mentioned are only samples as a guide, please refer to your actual radio link.

The owner of the radio station can enable the personal panel for each deejay.
Depending on the permissions set, Deejay can use the following features (In this example all features are enabled):

  • Manage Account

Here the Deejay can enter personal data and change the password.

  • Profile Picture
  • Show Live DJ/Widget
  • Change Language
  • AutoDJ Management – Play Jingle/IDs/AD Now (On Air)
  • Voice Pro (On Air)

How to remove multiple posts with a single click in WordPress?

It is possible to remove multiple post in your WordPress dashboard. You can also remove selected posts with just a few clicks.

1. Login to your WordPress admin dashboard.
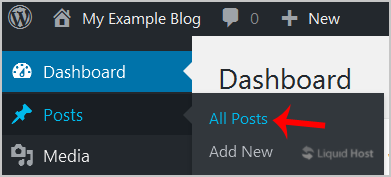
2. Under the dashboard menu, hover your mouse over Posts and click on “All Posts“.

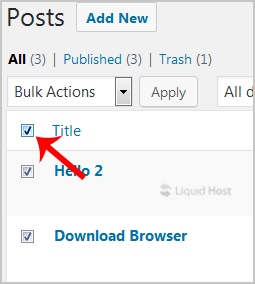
3. Tickmark the top checkbox and all checkboxes will be automatically selected.

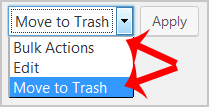
4. Now click on “Bulk Actions” and select “Move to Trash” from the drop-down menu. Then click on “Apply“.

It’s done. Your post is removed and no longer available for public view.